The Problem
After a while of not posting any blog content and migrating my blog from AWS to Azure, I quickly find that posting new content after generating static content of my blog and have it uploaded, I have to manually go into Azure CDN profile to have the cache purged for the new content to become visible via my domain. This will quickly become a repetitive task and I wanted to automate this process and safe me time from manually purging the CDN and at the same time, spend little to nothing on costs in doing so. I currently host my blog on Azure blob storage as a static site. Azure has amazing services to do just that.
The proposed solution
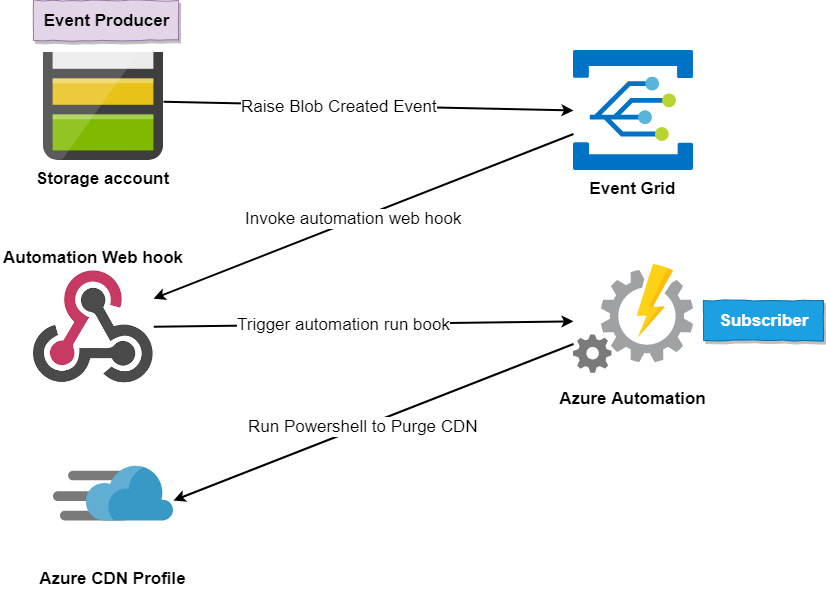
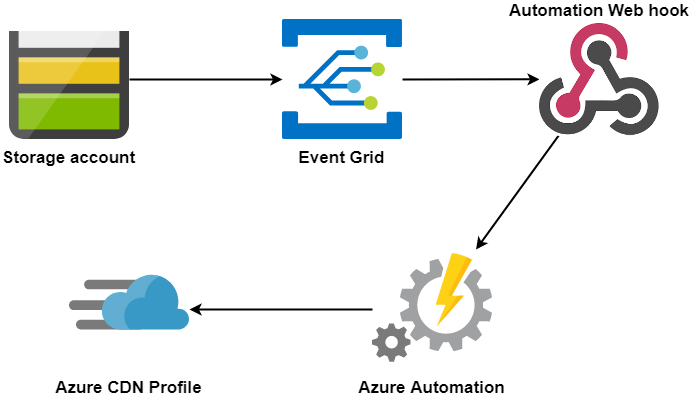
Azure offer amazing services to help resolve this issue. The proposed solution is summarised as follows; Azure storage blob emits an event whenever new contents are uploaded. Azure Event Grid listens to the event and notifies interested subscriber(s) about the event raised by the blob storage. Event Grid triggers a webhook attached to an automation Powershell runbook which purges the CDN cached contents thereby allowing for the new contents to become available immediately after new content is uploaded to the blob storage.

The Details

In short, Azure Event Grid enables you to build event-driven architecture and capable of integrating with a lot of Azure Services. This post will focus on implementing the proposed solution without going into details on what Event Grid is. Feel free to read more on Azure Event Grid here.
This post assumes you already have an Azure CDN profile in place as we won't be creating one in this post. Refer to this link if you need to create an Azure CDN; Quickstart: Create an Azure CDN profile and endpoint.
Az Module set up
The Azure run book is the hander of the event and will subsequently run the Powershell code to trigger and purge the CDN profile of its cached content. Let's begin by creating an Azure automation account.
From the Azure portal navigate to Automation Accounts and create an account.

Next navigate to the newly created automation account and nagivate to Modules blade under the Shared Resources section. We will be installing the Powershell Azure Az modules needed to run the Powershell scripts.
Azure currently provides two Powershell modules to interact with Azure resources and they are AzureRM and Az Modules. Azure recommends the use of Az module going forward as AzureRM will not be officially maintained from December 2020. More details here.
Click on Browse Gallery and install the following modules:
Az.Account - For authenticating and authorising with Azure
Az.Resources - For interacting with Azure resources
Az.Cdn - For manipulating Azure CDN resources
Az.Automation - For interraction with Azure automation

The search bar type Az. and hit the enter key on your computer and you should see results similar to the image below. Find all the module listed above and import them. See an example below.

Import example

The Automation Runbook
Now we have the Az modules setup and ready to go. Let's now create the Powershell runbook that will contain the scripts need to get the connection to our Azure automation account, authenticate and authorise with Azure, get details of our CDN and purge its content.
Navigate back to the Automation account and click Runbooks under the Process Automation blade or section and click on Create a runbook. Fill in the name of your runbook, choose Powershell as the Runbook type and give it a description of your choosing.

Copy and paste the below Powershell script into the newly created Powershell runbook.
    "Grabbing the connection..."
    $connectionName = "AzureRunAsConnection"

    $cdnProfileName = "your cdn profile"
    $RGName = "your Resource Group"
    $CdnEndpointName = "Your Cdn Endpoint Name"
    $AutomationAccountName = "Your Automation Account Name"


    try{
        $servicePrincipalConnection =  Get-AutomationConnection -Name $connectionName

        "Logging in to Azure...."
        Connect-AzAccount `
            -ServicePrincipal `
            -TenantId $servicePrincipalConnection.TenantId `
            -ApplicationId $servicePrincipalConnection.ApplicationId `
            -CertificateThumbprint $servicePrincipalConnection.CertificateThumbprint
    }
    catch{
        if(!$servicePrincipalConnection){
            $ErrorMessage = "Connection $connectionName not found."
            throw $ErrorMessage
        }else{
            Write-Error -Message $_.Exception
            throw $_.Exception
        }
    }

    "Fetching the CDN custom domain name...."
    $customDomain = (Get-AzCdnCustomDomain -ResourceGroupName $RGName -ProfileName $cdnProfileName -EndpointName ghost)[0].HostName

    "Purging everything in the CDN with domain name: $customDomain ...."
    Unpublish-AzCdnEndpointContent `
        -ProfileName $cdnProfileName `
        -ResourceGroupName $RGName `
        -EndpointName $CdnEndpointName `
        -PurgeContent "/*"
Testing & Publishing the Runbook
It's time to test and publish the runbook. Still, on the runbook, you created the last time, click on the Test pane and click the Start button to manually trigger the runbook.


If everything is properly implemented, the Powershell runbook should start running and have the status displayed in the job stream log and when the test is completed successfully, a completed status along with the stream is displayed.


Navigating to Azure CDN profile and inspecting the activity log, you should now see a Purge operation with a Succeeded status, how long the operation took and the service principal that initiated the action which is the AzureRunAsConnection we agreed for Azure to create when we created the automation account. Behind the scene, Azure created this service principal of type AzureServicePrincipal with Azure Active Directory (AAD) to save us the plumbing details. For more details visit the connections blade under the shared resources section of your automation account to see details this service principal.


Now we have a working Powershell runbook ready to be triggered. Let wire up a webhook that will trigger the runbook.
The Webhook
Azure automation runbook can expose an HTTP endpoint or webhook whichever makes sense. In the context of Azure automation runbook, it's called webhook. The webhook, in this case, is analogous to a different or channel with which messages and triggers get to the runbook.
To create the webhook, navigate to the runbook you have created and tested and click on Add webhook, select Create new webhook, enter your preferred name for the webhook, select enabled, set the expiry date, ensure you keep the webhook URL for later use and click OK and Create to create your webhook.


The Event Grid
Before I go any further I would like to clarify that Event Grid System Topics are system topics in Event Grid that represents events published by Azure services such as Event Hubs, Azure storage account. Here is a list of Azure services that supports system topics.
To be able to use Event Grid System Topics, Event Grid services has to be enabled on your Azure account on the subscription level otherwise, Azure services raising events and subscribers/handler for those events will not work.
If you don't have the EventGrid enabled, you can navigate to your Azure subscription and in the Resource Provider section under Settings, type Event in the search bar, select Microsoft.EventGrid, click Register/Re-register and give it a little while to complete the setup. Once completed, you should see a green checkmark with the status of Registered.

Gluing everything together
As you may have noticed, Azure provides various ways of achieving the same thing. We could go create an Event Grid System Topics and manually work through the steps or we could go via the resource whose event we are interested in and in this case, the azure blob in a storage account. Since we have Event Grid registered, we are ready to go complete the final piece by doing the later.
Navigate the Azure resource you want its events to be raised and navigate to on the Events. For this walk through, I want my event raised from the storage account where I host my static site.
From the Events blade, click Event Subscription to create the subscription

Fill in the parts to have the subscription created. Remember to use the webhook URL we created in the Webhook section of this post, click confirm the selection.

Next, you want to add a filter to the event such that your storage account doesn't fire off event for every blob created across the storage account but limit it to a specific container(s) or event blob. To do this, we have to filter the event and Event Grid is brilliant for that. using the subject filter of /blobServices/default/containers/<containername>/
This filter rule says Blob Created events should only be raised for blob(s) in the container with the name <containername> and in my case, it's $web. This locks the events raised from the storage account to the container level, thereby saving costs and not having events fire when you don't need them to.

Once the subscription is created, at this point you should have everything wired up together and ready to do. You should now have your storage account subscriptions or your Azure resource events subscriptions similar to the image below.

After running a couple of tests via your event producer, in my case, the blob storage where I have my static site hosted, observing the event subscription that we created, you should see the metrics of the event that has occurred and its state.

The Costs
The cost of Event Grid is £0.448 per million operations while the first 100,000 operations are free per month. Applying the filter as we discussed and reduce the amount of event executed, you may never have to pay for the Event Grid. The monthly free 100,000 operations would do the job just fine. More details of Event Grid pricing here.
Summary
In this blog post, the use of Event Grid combined with Azure automation to help automate a process that would otherwise take painstaking time to do. This lays the groundwork to build event-based, decoupled and robust architecture. A good number of Azure resources supports integration with Event Grid and provide a varying number of possibilities.
Additional Resources
Managing Connections in Azure Automation

